Complete Walkthrough & Strategy Guide
Introduction
Welcome to the complete walkthrough guide for 7 Days Blood Moons, an asymmetric 4v1 multiplayer experience that combines FPS, survival horror, RTS, and tower defense into one intense gameplay experience. Developed by iLLOGIKA and The Fun Pimps (creators of 7 Days to Die), this game offers two distinct gameplay experiences: fight as one of four Survivors defending against zombie hordes, or dominate as the Zombie Horde Master commanding the undead army.
About This Guide
This walkthrough is organized into sections covering both Survivor and Zombie Master gameplay. Whether you’re learning the basics or looking to master advanced strategies, this guide will help you survive another day — or crush humanity’s last hope.
Game Overview
7 Days Blood Moons features:
- Asymmetric 4v1 multiplayer (4 Survivors vs 1 Zombie Master)
- Hybrid PvE/PvP experience with AI and player-controlled threats
- Destructible voxel world for dynamic defense building
- Robust progression systems for both roles
- Multiple genres blended into one experience
Game Modes & Win Conditions
Day/Night Cycle
Survivor Goal: Survive until the end of the fourth night.
- During the Day: Focus on preparation — loot containers for resources, health packs, and ammo; build defenses.
- During the Night: Expect larger zombie attacks; defend your position.
- Win Condition: Survivors win if at least one player survives until the end of Night 4.
Zombie Master Goal: Eliminate all survivors before the end of Night 4.
Survivor Walkthrough
Overview
As a Survivor, your goal is to work with up to three teammates to survive until morning. You’ll need to scavenge, build defenses, and fight off waves of zombies controlled by the Zombie Master.
Core Gameplay Loop
Survive
- Coordinate with your team.
- Manage weapons and ammo carefully.
- Keep fortifications repaired.
- Heal and revive teammates.
- Conserve ammunition — use melee when possible.
Scavenge
- Search ruins and loot boxes.
- Gather building materials and ammo.
- Collect medkits and rare resources for crafting.
Build
- Fortify nearby structures.
- Reinforce walls and deploy traps.
- Coordinate defensive strategies with teammates.
- Destroy ladders and blocks to control zombie paths.
Progress & Craft
- Unlock new weapons, perks, and constructibles between matches.
- Craft gear with scavenged materials.
- Create loadouts tailored to your role.
Customize
- Choose outfits and gear to personalize your survivor.
Survivor Controls
Movement
- Look: Mouse or right stick
- Move: W/S/A/D or left stick
- Jump: Hold jump button
- Crouch: Use crouch key
- Sprint: Hold sprint (consumes stamina)
Combat
- Ranged: Primary fire
- Melee: Primary = normal, Secondary = heavy attack
- Interact: F key
Health & Healing System
Self-Healing
- Press 5 to use Health Kit.
- Provides instant healing.
- Monitor HUD for health status.
Healing Teammates
- Within 40 meters, press F to heal with your kit.
- Uses your kit but heals teammate instantly.
- Recommended if they’re <50% health and you’re >80%.
Status Effects
- Infection – fatal if untreated
- Broken Arm – reduces combat ability
- Broken Leg – reduces movement speed
- Bleeding – fatal if untreated
Weapons & Equipment
Weapon Crafting
- Access Workbench via Equipment menu.
- Requires resources from matches.
- Each weapon needs specific materials.
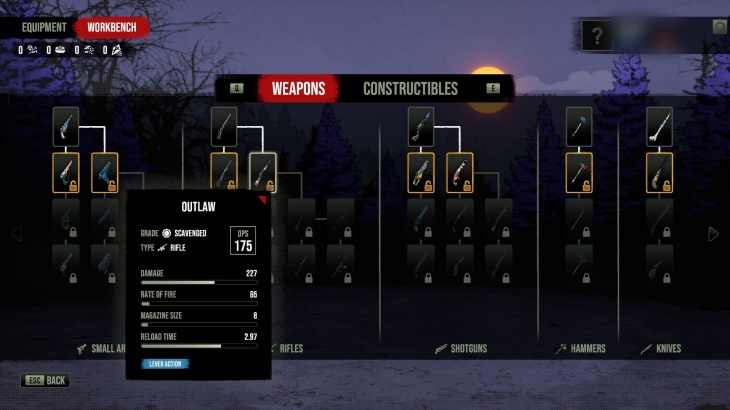
Loadout Customization
- Edit via Equipment menu.
- Customize weapons, visuals, and perks.

The more you survive, the better your tools become. Collect rare resources to unlock stronger weapons and upgraded constructibles. Progression rewards coordination — each match strengthens your chances of surviving the next Blood Moon.
Constructibles System
Constructibles are your lifeline for fortifying defenses and shaping the battlefield. You’ll start with a few basics but can unlock advanced options as you progress.
Construction Wheel
- Configure via Equipment menu.
- Select and assign constructibles.
- Craft new items in Workbench.
Types
- Defensive (walls, barricades)
- Traps and obstacles
- Support items
- Special defenses
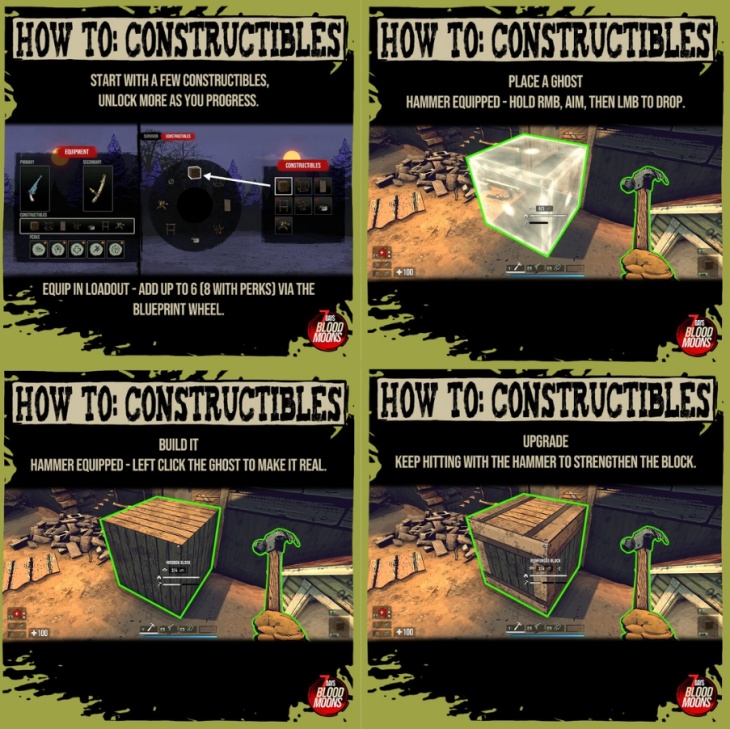
How to Build & Upgrade
- Add Constructibles to Your Wheel:
Equip up to 6 constructibles (8 with perks) through the Blueprint Wheel. - Place a Ghost:
With your hammer equipped, hold RMB, aim, and LMB to drop the “ghost” block. - Build It:
With the hammer still out, left-click the ghost to construct the real object. - Upgrade It:
Keep hitting with your hammer to reinforce the block — stronger materials mean better protection.
Tip: Strong walls mean longer nights survived. Always upgrade critical choke points before a Blood Moon event.
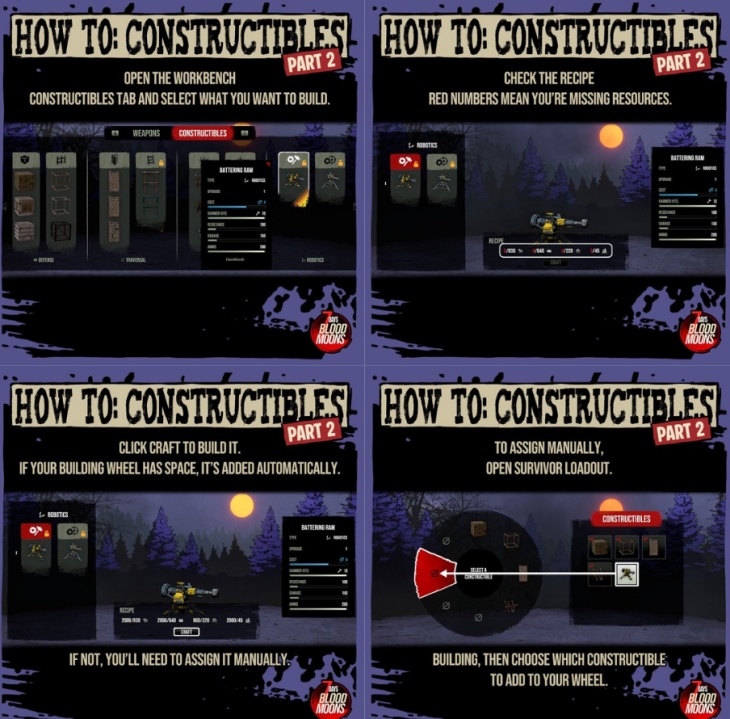
Unlocking and Crafting Constructibles
After each round, you’ll earn special ingredients used to craft new constructibles at the Workbench.
- Open the Workbench:
Go to the Constructibles tab and choose what you want to build. - Check the Recipe:
Red numbers mean you’re missing materials. - Click “Craft” to Build It:
If your constructible wheel has an open slot, it’ll auto-equip; otherwise, assign it manually. - Assign Manually (if needed):
Open your Survivor Loadout, select a constructible slot, and choose the new build.
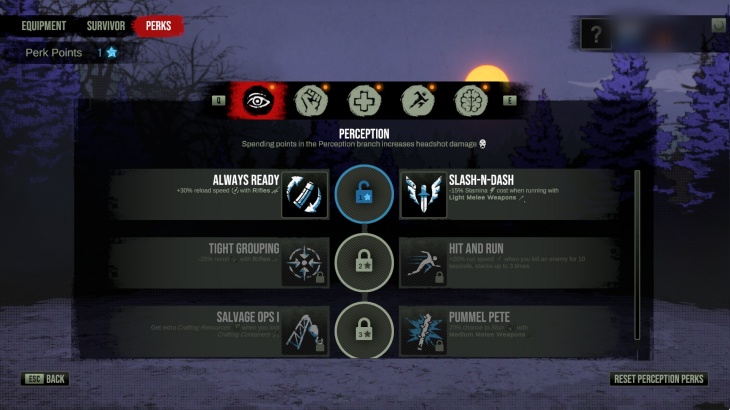
Perks System
- Unlock passive bonuses by leveling up.
- Different perk tiers open over time.
- Choose perks suited to your playstyle.
- Both Survivors and Zombie Masters have separate perk trees.
Special Items & Events
Parachute Drops
- Arrive periodically with resources/ammo.
- The Zombie Master can destroy them.
Hero Boxes
- Contain powerful items.
- Appear for a limited time — act quickly.
Strategy Tips
- Day Phase: Focus on looting/building.
- Priority: Health kits > Ammo > Materials.
- Team Roles: Builder, looter, defender.
- Defense Layers: Create fallback positions.
- Night Combat: Conserve ammo; use melee.
- Healing: Revive downed teammates fast.
Zombie Master Walkthrough
Overview
As the Zombie Horde Master, control undead forces from an RTS-style command view or by directly possessing zombies in third-person.
Core Gameplay Loop
Strategize
- View battlefield from the sky.
- Locate Survivor base.
- Place spawn tokens and coordinate attacks.
- Use day zombies for sabotage and scouting.
Command
- Issue orders: Follow, Attack, Cancel.
- Launch multi-front assaults.
- Use numbers and timing to overwhelm.
Possess
- Take direct control of zombie units.
- Each zombie type has unique abilities.
- Hunters chase; Wreckers destroy; Sappers disarm traps.
Harvest & Progress
- Collect human remains for crafting.
- Unlock new zombie types.
- Advance perks for specialized destruction.
Zombie Master Controls
Commander View
- Switch between command and possession modes.
- View BMP (Blood Moon Points) costs.
Possession Controls
- Move similar to Survivor controls.
- Sprint uses Rage meter.
- Primary = attack; Secondary = special ability.
- Rally nearby zombies or lock onto targets.
Blood Moon Points System
- Each night grants a BMP budget.
- Each zombie costs BMP; stronger ones cost more.
- BMP budget increases nightly.
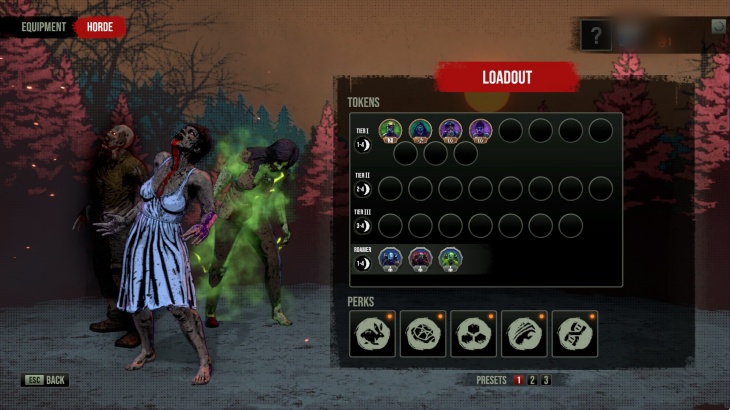
Token System
- Place tokens to spawn zombies at chosen locations.
Zombie Loadout System
- Access via Equipment menu.
- Customize available zombies.
- Choose which appear each night.
- Craft tokens using match resources.
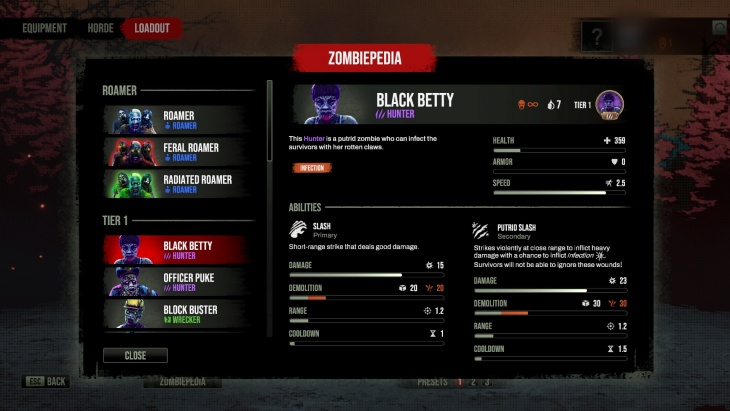
Zombie Types & Abilities
- Standard: Basic infected, low cost.
- Hunters: Fast pursuit units.
- Wreckers: Heavy structure destroyers.
- Special Infected: Unique powers from 7 Days to Die universe.
RTS Command Strategies
- Scout early for survivor bases.
- Place tokens from multiple angles.
- Manage BMP carefully (quality vs. quantity).
- Possess zombies at key moments.
- Time special abilities effectively.
- Deny survivors by destroying parachute drops.
Final Advice:
Survive the day. Master the night.
Credits: iLLOGIKA and The Fun Pimps
If you have any questions or have any problems/bugs, please use the support link (Discord, Forum Topic, GitHub Issues, etc.) in the post. If there is no support link in the post, please use the comments section.