When you know the right steps, installing mods for 7 Days to Die is very easy. Below is a quick guide to help you set everything up and start enjoying your mods right away.
1. Create a “Mods” Folder
Note for 7 Days to Die V1/V2 users:
In version 1.0+, a “Mods” folder is automatically created. If you’re using 7 Days to Die 1.0 or later, you can skip this step.
Important: There is a “0_TFP_Harmony” folder inside “Mods” folder. Do not delete it! This is a vanilla folder required for C# mods to work. For more details, visit Stop Deleting the Harmony Folder.
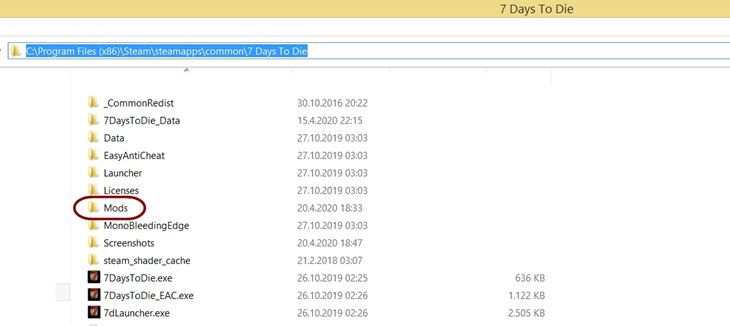
For Alpha versions (Alpha 21 or earlier), you’ll need to manually create a “Mods” folder in the game’s installation directory. This is where you’ll place any mods you download.
Steam:C:\Program Files (x86)\Steam\steamapps\common\7 Days To Die
If you plan to use mods on a server, create a “Mods” folder in the server’s installation directory.
Dedicated Server:C:\Program Files (x86)\Steam\steamapps\common\7 Days To Die Dedicated Server
2. Download the Mod
We feature thousands of mods on our website, so browse around and pick what you like.
3. Extract the Mod and Put It in the “Mods” Folder
(This is the most important step. Please read the instructions carefully.)
Make sure you have a program (like WinRAR, 7-Zip, WinZip) on your PC to extract archived files, because Windows’ default .zip extractor is very basic and won’t be useful for many different file types.
1. Extract the downloaded mod file (usually a .zip, .rar, or .7z archive).
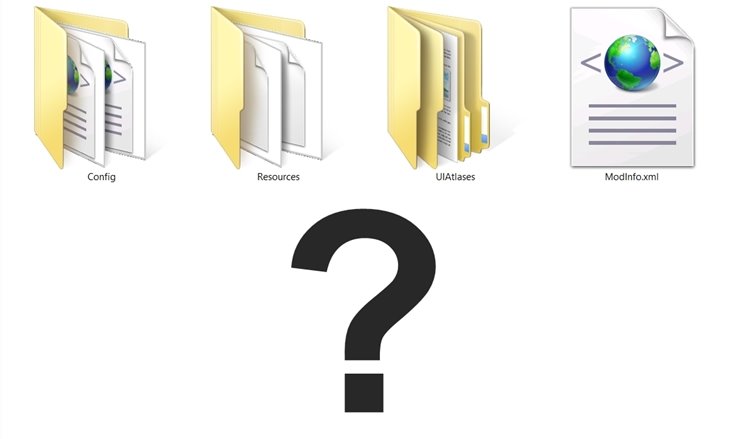
2. Within the extracted file, identify the correct folder. This folder must contain the “ModInfo.xml” file.
For example, if your download path looks like this:
\Downloads\ExampleModFolder1\ExampleModFolder2\ExampleModFolder3\ModInfo.xml
The correct folder to copy is “ExampleModFolder3” .
3. Copy that folder and paste it into your “Mods” folder.
Where is the “Mods” folder?
C:\Program Files (x86)\Steam\steamapps\common\7 Days To Die\Mods
When you paste the correct mod folder, the final state of the directory will be as follows:
C:\Program Files (x86)\Steam\steamapps\common\7 Days To Die\Mods\ExampleModFolder3
Click to view the server installation details.
C:\Program Files (x86)\Steam\steamapps\common\7 Days To Die Dedicated Server\Mods
When you paste the correct mod folder, the final state of the directory will be as follows:
C:\Program Files (x86)\Steam\steamapps\common\7 Days To Die Dedicated Server\Mods\ExampleModFolder3
Still have questions about this step? You can clear everything up by downloading an example folder structure with the correct installation:
DOWNLOAD Example Folder Structure (5 KB)
Please do not attempt to install the contents of this file. It is just an example file designed to help you understand everything more clearly.
4. Run the Game and Enjoy the Mod
After completing the steps above, launch the game. Your mods should now be active!
Additional Notes
Different Installation Methods
Some mods require different installation steps. Always follow the specific instructions provided by the mod’s creator if they differ from this guide.
Alternative Mod Folder Location
According to TFP (The Fun Pimps), there is a new alternative mod folder location starting with Alpha 20.4 b42:
Alpha 20.4 b42: Mods are now loaded from <UserDataFolder>/Mods (i.e. the folder that also stores saves, e.g. on Windows %APPDATA%/7DaysToDie/Mods) in addition to <game folder>/Mods. In a future build this will change to only load from that new location so no data is written/changed in the program folder at any time.
Final Tips
- Back up your saves before installing any mods.
- Check each mod’s instructions for compatibility and updates.
That’s it! We hope this guide helps you get started. Happy modding!