Description
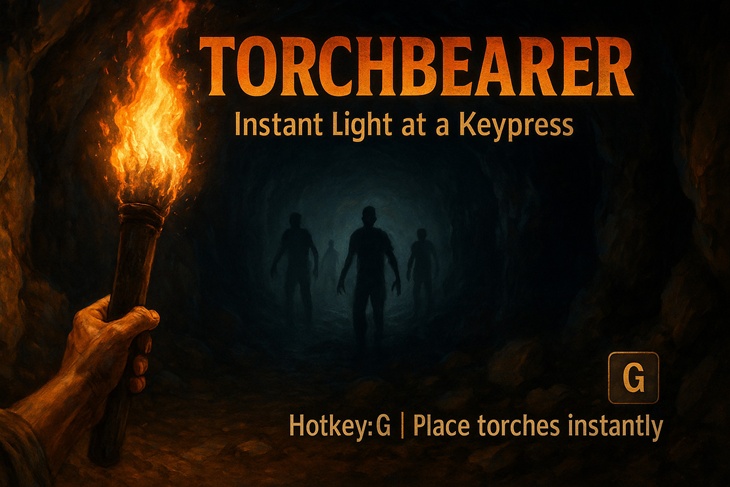
The perfect mod for early days, no need to worry about poor lighting or cheating in a helmet light mod. One simple press lets you lay down a torch while you keep your weapon in your main hand.
Torchbearer mod is a comprehensive quality-of-life utility designed to make lighting your way in the world of 7 Days to Die seamless and intuitive. It removes the need to break your flow by opening the inventory, finding your torches, and placing them manually. With a single press of a button, you can illuminate your surroundings, keeping you focused on exploration, building, or survival. It is perfect for early days before the helmet-light mod or night vision goggles become available.
This mod was built to be powerful yet user-friendly, offering full control over its features through either a simple in-game UI menu or a robust set of console commands for power users.
Key Features
Instant Torch Deployment: Place a lit torch in the world with a single, configurable hotkey (Default: G).
Two Placement Modes: Choose the style that best fits your situation!
Aimed Placement (Default): Places a torch precisely where your cursor is pointing, on walls, floors, or ceilings. This is the exact behavior of a vanilla torch.
At Feet Placement: Instantly drops a torch in the block space at your feet. Ideal for emergencies when you’re suddenly plunged into darkness or need immediate light without aiming.
Optional Item Consumption: You decide how you want to play.
By default, placing torches is free.
Enable “Consume Mode” to have each placement use one torch from your inventory or toolbelt.
If consumption is on and you have no torches, a clear “denied” sound will play, and no torch will be placed.
Smart Torch Limit (Anti-Clutter): When in the default Consumption mode of ‘free’; to keep your world clean and performance high, the mod will only allow the last 10 torches placed via the hotkey to exist at one time. When you place your 11th torch, the 1st one you placed is automatically removed from the world. This does not effect torches that you have placed in the world with the vanilla method of: selecting the torch from your hotbar and right clicking. Manually placed torches will remain while the mods torches will be removed after the limit of 10.
Fully Integrated In-Game Settings UI: No need to remember every console command! Simply press Escape while in-game and click the new “Mod Options” button to access a dedicated menu where you can easily toggle settings and set your hotkey.
Full Console Control: For those who prefer the command line, every feature is controllable via simple console commands.
Grouped & Discoverable Commands: All mod-related commands are prefixed (e.g., zmod_torch_…) to group them together at the bottom of the vanilla help list for easy discovery.
Unified Mod Help System: This mod includes a master help command (z_master_modhelp) that lists the commands and descriptions for all of your installed mods that use this shared help registry system, making it easy to manage multiple mods.
How to Use the In-Game UI
The easiest way to configure the mod is through the built-in UI:
Load into your game world.
Press the Escape key to open the main menu.
Click the new “Mod Options” button.
You will see a sub-menu with the following options:
Toggle Consumption: Click to switch between consuming torches from your inventory (“ON”) or placing them for free (“OFF”).
Toggle Placement: Click to switch between “AIMED” (at cursor) and “AT FEET” placement modes.
Set Hotkey: Click this button, and it will prompt you to “Press any key…”. The next valid key you press on your keyboard will become the new hotkey. Pressing Escape cancels the action.
Back: Returns to the main Escape Menu.
Console Commands
All commands are case-insensitive and can be entered in the F1 console.
Master Mod Help
Command: z_master_modhelp (or modhelp, helpmod)
Description: Displays a formatted list of all registered commands from all of your mods that use this help system. This is the best way to get an overview of what’s available.
Set the Deployable Hotkey
Command: zmod_torch_settorchkey <KeyName>
Alias: sth <KeyName>
Description: Changes the key used to place a torch. <KeyName> should be a valid Unity KeyCode string (e.g., F, G, H, J, K, L, F5, Alpha1, etc.).
Example: zmod_torch_settorchkey K
Toggle Torch Consumption
Command: zmod_torch_toggletorchconsumption [on/off]
Alias: ttc [on/off]
Description: Toggles or sets the inventory consumption mode. If you provide “on” or “off”, it sets the mode directly. If you type the command with no argument, it will toggle the current setting.
Example: zmod_torch_ttc on
Set Torch Placement Mode
Command: zmod_torch_settorchplacement <aimed/feet>
Alias: stp <aimed/feet>
Description: Sets the placement behavior. Use “aimed” to place where you are looking, or “feet” to place at your character’s position.
Example: zmod_torch_stp feet
Installation
Download the mod .zip file.
Unzip the contents.
Place the entire Torchbearer folder into your 7 Days to Die Mods folder.
The standard path is: %APPDATA%/7DaysToDie/Mods
(You can type this path into your Windows Explorer address bar).
Ensure EAC (Easy Anti-Cheat) is disabled in the game launcher to use C# mods.
Images
Videos
Changelogs
- (new) Updated for game version 2.0 b292
- Corrected missing assemblies and call changes for game version 2
Download
DOWNLOAD Torchbearer V1.2 for game version 2.0 Storm’s Brewing b292 (38 KB)
Credits: jucah, Google Gemini and ChatGPT


If you have any questions or have any problems/bugs, please use the support link (Discord, Forum Topic, GitHub Issues, etc.) in the post. If there is no support link in the post, please use the comments section.